عربي
عربي


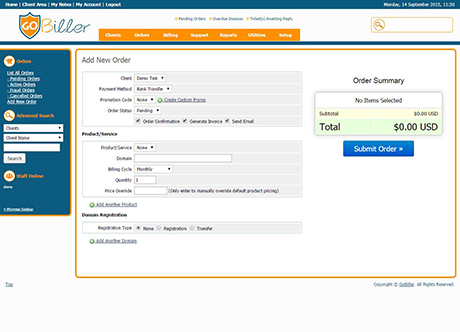
Placing an Order
You can place an order by going to Orders > Add New Order.
Note: An easier way than using the dropdown menu on the add order page to locate the client you want to add the order to is to locate the client first using the GoBiller intelligent search and then from the Actions menu on the Clients Summary page, just click the Add New Order link and the client will be preselected.
- Begin by selecting the client from the dropdown and choosing the payment gateway with which you want the client to pay.
- Select a promo code from the dropdown of activate promotions to apply a discount to the order. Any discount amount selected here will be applied to the order regardless of any requirements in the promotion configuration, when staff select a discount it is always applied.
- Next, choose the product/service and billing cycle. Here you can specify a quantity if you wish to add duplicates of the same product and specify a price override if you don’t wish to charge the standard product pricing.
- If the package comes with a domain, enter the users domain in the box provided. And if the domain is registered with you, you should select the "Register" option and choose any Servies the user has for their domain.
- To add more products to the order click the “Add Another Product” link, this allows you to add a different product whereas the quantity option above would add exact duplicates.
- The Order Setting options allow control over whether the order confirmation email is sent to the client, whether an invoice is generated and if an invoice notification is emailed to the client.
Accepting Pending Orders
Whenever an order is placed in GoBiller, it comes in as a pending order. To view pending orders, go to Orders > List Pending Orders and click the Order ID. From there you can accept or deny the order.
Even if you have auto activation enabled, then while the products and services in that order may be automatically provisioned and delivered to the customer, the order status will remain pending until you manually confirm it. This is so that you can always see and review the new orders you've had and be able to manually review, check for fraud, problems, etc...
Products
If the order contains any products, you will see those listed in the order items and if the products are linked to a module, and the product/service has not yet been activated (for example by auto activation on payment) then you'll see the options to select a server to install it to, define a username & password, tickbox to create the account and tickbox to send the welcome email. Ticking the "Run Module Create" box will run the associated module creation command when you accept the order.
Domains
If the order contains any domains, and they haven't been activated by an automated action on receipt of payment, then you'll also have the option to choose a Domain Registrar and tickbox for "Send to Registrar" to define if you want it to be submitted via the API. You'll need to do this if you don't have automatic registration enabled or are wanting to register/transfer the domain without payment.
It is important to note that while all orders are pending until activated, the items in that order - hosting accounts and domains - will be automatically activated based on your auto setup options and auto registration options. So if you have them set for instantly upon payment that will be done while the order remains pending. This is to ensure you manually review each order you get.
Reviewing Fraud Check Results
If you use the MaxMind service, then you might want to check the results sent back from MaxMind regarding an order. You can do this from the order details page. You get to that by clicking the Order ID number for an order next to the order in the list of orders. You will then see an option labelled "Fraud Check Results" which will list what was received back from MaxMind regarding that order.
If you decide that the order was infact not fraudulent, and you want to therefore manually overide the fraud check, you can do that by clicking the Set Back to Pending button which will change the order status from Fraud to Pending and the invoice back to Unpaid. This then allows the user to go ahead and make payment from the client area as normal, or if a merchant gateway is in use, you can click through to the invoice and instantly attempt to capture the clients payment using the Attempt Capture button displayed on the invoice.
Note that if an order's fraud score is over your setting's threshold it will skip the 'Pending' status and be set to 'Fraud'.
Custom Order Statuses
As standard there are 4 order statuses which should cover most situations; Pending, Active, Fraud and Cancelled. Should more be required they can be created via the Setup > Other > Order Statuses Page. More information can be found on the Order Statuses page.