عربي
عربي


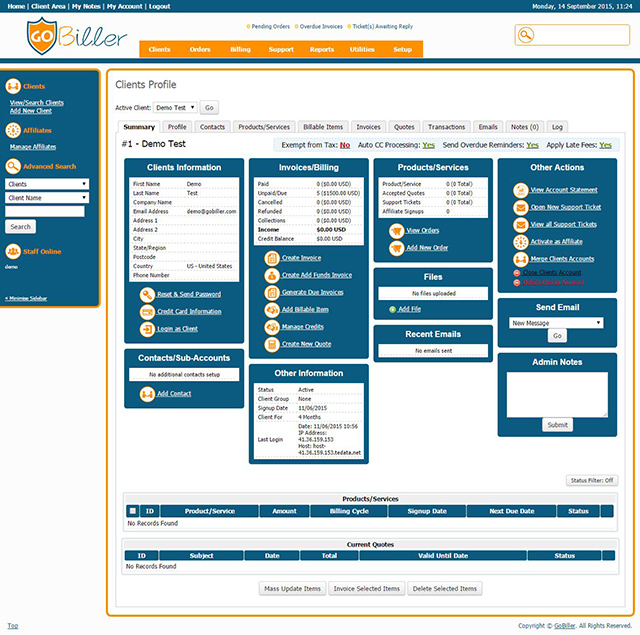
Summary Actions
The very first thing in the top-left corner of the page is the client's unique ID number and their name. To the right of this are the summary actions, these allow for quick management of billing-related settings. By clicking the red "No" or green "Yes" text you can instantly toggle the status of the available options:
- Exempt From Tax - If Yes the client will not be charged tax even if they meet a tax rule
- Auto CC Processing - If Yes the client's credit card stored in GoBiller will automatically be charged on invoice due dates
- Send Overdue Reminders - If Yes the client will receive overdue reminder emails when their invoices become overdue.
- Apply Late Fees - If Yes the client will be charged a late fee when their invoices become overdue. Late fees must be activated and configured in General Settings and Automation Settings
Clients Information
This section displays the client's contact information; name, address and phone number. In addition there are the following links:
Reset & Send Password
Clicking this link will instantly generate a new client area password for the client and email it to them.
Clients can also request a password reset themselves by clicking the the Forgotten Password link on the login form to begin the reset process:
- After entering their email address, if a security question answer is specified they will be prompted to provide the answer, then an email is sent containing a confirmation link to ensure they are actually the one who requested the reset. The reset link is valid for 2 hours from the time of request
- When they click the link in the email, clients will be taken to the password reset validation page where a new password can be specified. They can then login immediately using the new password. If the client didn't request the reset they are advised to simply ignore the email and not click the link.
- When they click the link in the email, clients will be taken to the password reset validation page where a new password can be specified. They can then login immediately using the new password. If the client didn't request the reset they are advised to simply ignore the email and not click the link.
Credit Card Information
Displays a popup containing the client's credit card information (if using a merchant payment gateway) or the Token ID (if using a tokanisation payment gateway).
Adding a New Card
You can replace the existing card stored for a client (if none is already stored) at the bottom of this page. Simply enter the card details (card issue and start date are optional) and click Save Changes.
Viewing Full Card Number
In order to view the full card number, on this screen you will see a text area asking for the CC Encryption Hash. This is the random hash key unique to your GoBiller installation which you can find in the configuration.php file. Enter the hash into the text area and click submit, the page will reload showing the full number.
Removing Card Details
f you would like to remove card details from a client, simply click the Clear Details button located at the bottom of the screen.
Login as Client
View the client area exactly as this client would see it and even perform actions on their behalf (placing orders, opening tickets etc.) Once you are finished be sure to click the "Return to Admin Area" link in the top-right corner.
Contacts/Sub-Accounts
If a client has created Contacts or Sub-Accounts, they will be listed here. Click the contact's name to edit the record. This is explained in more detail on the Contact Tab page.
Add Contact
Click here to create a new contact or sub-account for this client.
Invoices/Billing
In this section quick invoice and billing statistics are displayed; the number of invoices in each status along with the total value of each in brackets. The Total Income statistic shows the total of all transactions paid by the client, whilst the Credit Balance shows the current amount of credit available to the client to spend.
Create Invoice
This link creates a custom invoice. Clicking the link immediately creates an empty invoice to which line items can be added as desired. This link will not trigger the sending of an email to the client.
Create Add Funds Invoice
You can create invoices in this way to allow a client to deposit funds to their account, or to charge a specific amount from a clients credit card. A popup will appear allowing the amount of credit to be specified. More Information.
Generate Due Invoices
Click here to generate any invoices due for the client's services, billable items, s or . Useful if one of the aforementioned items has been modified and a new invoices needs to be generated without the need to run the entire automation cron job. A popup will appear asking whether you wish to send the invoice notification email.
Add Billable Item
This link will take you directly to the Add Billable Item interface. Read more about Billable Items here.
Manage Credits
Displays a popup displaying the client's credit history; how credits were earned and spent. Credit can also be manually added and removed using the appropriate buttons. You also have the option to delete entries if you wish and they will then be deducted from the credit balance.
Create New Quote
- To create a new quote, begin by going to Billing > Quotes > Create New Quote
- Enter a subject for the quote (this will be visible by the client) and alter the creation and valid to dates if necessary which will default to todays day and one month in the future respectively by default
- Next, choose if the quote is for an existing client or a new client. If it's for a new client you can enter their details and only if/when the quote is converted to an invoice will a client account be created for them
- You are now ready to add the first line item to the quote. For each item, you need to set a quantity, description, unit price and discount percentage. The total is calculated as quantity x unit price - discount %. If you want to add more lines to the quote, click the Save Changes button and a new line entry will appear
- At the bottom of the page, you can set customer notes and admin only notes. Customer notes will be shown on the quote to the client and admin only notes will never be shown to the client.
Other Information
In this section, miscellaneous information is displayed; the client's status, their client group, signup date, length of time since signup and the IP address, hostname + time of their last login.
Products/Services
In this section the numbers all the services, s quotes, support tickets and affiliate signups for this client are displayed. The active service count is displayed first, with the total - including services in suspended, terminated and cancelled statuses - in brackets.
View Orders
Click this link to see a list of all orders placed by this client. Read more about Order Management here.
Add New Order
This link will take you to the admin order form. This allows orders to be placed on behalf of the client, and for products and promotional codes to be used in combinations not possible on the public order form.
Files
The files section in a client's summary allows you to upload files specific to that customer.
- This can be used for documents, agreements or other downloads specific to the individual
- Files can be set as Admin Only to only be viewed by admins, otherwise they show on the Client Area Homepage for the client to be able to download
- Files are uploaded to the /attachments directory and can be added and managed from the Client Summary page in the admin area
Recent Emails
Displayed here are the last five emails sent to the client by GoBiller. A longer email history can be viewed under the Emails tab.
Other Actions
Within this section are a number of miscellaneous links which perform a variety of tasks.
View Account Statement
Provides a statement of account for this client accounts between a date range. Displays Type (add funds, transaction, invoice), date, description, credits, debits and a running balance
Open New Support Ticket
This link enables you to open a support ticket under the client's account. Useful for initiating correspondence with the client and keeping a full record of the conversation.
View all Support Tickets
Click here to see see a list of all support tickets assigned to the client in the departments to which your administrator account is assigned. If the client had tickets in departments of which you are not a member, they would not be displayed here.
Activate as Affiliate
If enabled clients can join the affiliate program from within the client area. Staff members can also add the client to the affiliate program by clicking this link.
View Affiliate Details
Once the client has been activated as an affiliate, the 'View Affiliate Details' link will be displayed in its place. Click it to see the client's referrals, commissions pending and paid, as well as your payments to them.
Merge Client Accounts
Merging clients combines 2 separate client accounts in GoBiller into one. This merges everything relating to the 2 separate entities into one including but not limited to products, invoices, transactions, tickets, etc...
- Begin by locating the first of the clients you want to merge
- Click the Merge Client Accounts link on the Client Summary page
- In the popup that appears, you will be asked to enter the Client ID. If you don't know the client's ID the Search field can be used to search by name, company or email address. Click the client's name and the ID will be filled in.
- After specifying the second client, you can choose which profile you want to keep, so either merge into the first client, or second client - this determines which profile data is kept - ie. name, email address, etc...
- Once happy, click the submit button to complete the process
Close Clients Account
Closing a client's account will prevent them from being able to login to the client area. This link will also change the status of unpaid invoices to cancelled, and all services to cancelled. It will not run any module termination functions.
Delete Clients Account
Deleting a client removes everything related to that client from the GoBiller database - except for transactions - they are considered income and that isn't being refunded just because the client is being removed. You will be asked to confirm the deletion, the user will be removed and you will be returned to the Clients List. Should you wish to remove their transactions as well, this should be done via the Transactions tab before deleting the client.
Send Email
Use this dropdown to send any 'General' type email templates to clients, or select the "New Message" option to compose a new email from scratch. Product and type emails can be sent using the dedicated dropdowns under the corresponding tabs.
Admin Notes
Here staff can enter private notes about the client to be displayed to whoever views this Summary tab. Separate notes sections are available available under the Products/Services , s and Notes tab.
Filtering Products
There may be situations where it's desirable to filter the client's product/services list to only display items in certain statuses. For example if a client has lots of old cancelled services you may wish to only display the active, pending and fraud products (hiding the cancelled ones).
To achieve this click the Status Filter button under the Admin Notes section within the client's Summary tab. A prompt will appear allowing you to select which statuses should be displayed.
The button will turn green so you can tell at-a-glance when the filter is applied.
Note: The filter selected here will apply across all clients and will be remembered until the web browser is closed.
Services and Quotes
The Services and Quotes lists will often take up the majority of the client's Summary tab. They provide a comprehensive list of all the client's services with you alongside key information for each (such as price, signup date, status and next due date).
The lists are ordered based upon the item's ID number. Click the ID number of the Edit icon to see the full details of the item from where you can make changes.
The Current Quotes section displays quotes with a Valid Until Date up to and included today's date. When this is passed they can be viewed under the Quotes tab
Mass Updating Services
The mass update tool in gobiller allows you to perform changes to 2 or more products inside a clients profile at the same time. The changes can consist of changes in the price, billing cycle, next due date, status and/or payment method and setting an override auto-suspend date. For example you can use this if you want to reduce a clients price on a number of separate products to the same level, execute module commands in bulk or if you would like to bring multiple services in line to a matching due date.
To use this feature from the Clients Summary page:
- Tick the checkboxes next to the Products/Services, and/or s you want to update,
- Below the item lists click the Mass Update Items button which will reveal the options which you can set.
- Make your selections (leaving blank any fields you don't want to change),
- Finally submit to complete the changes.
Create Prorata Invoice
This useful feature means that when changing the Next Due Date of a product/service/addon/ a pro-rated invoice is created covering the period between the current next due date and the new one. It even works when the various products have different next due dates to start with and will pro-rate each accordingly as separate line items on the invoice.
To use simply specify the new Next Due Date and tick the Create Prorata Invoice checkbox before clicking Submit. For example take two products that the client now wishes to pay on the 10th of the month going forward:
Product A - Next Due Date 01/01/2012 @ $30/month
Product B - Next Due Date 05/01/2012 @ $60/month
Set the Next Due Date to 10/01/2012 and tick the checkbox, an invoice with the following line items will be generated:
Product A (01/01/2012 - 09/01/2012) $8.00
Product B (05/01/2012 - 09/01/2012) $10.00
Total Due Today $18.00
Only once paid will the Next Due Dates for both products be updated and in future both products would be invoiced on the 10th January.
Invoice Selected Items
There may be times where a client asks for you to invoice them for the next renewal date early. To do this in GoBiller,
- Begin by navigating to the Clients Summary page for the client you want to invoice
- Now tick the boxes of the Products/Services/ and/or s you want to generate an invoice for
- To complete, click the Invoice Selected Items button to create the invoice(s) for them
- Multiple invoices may be created if the due dates and payment methods differ as invoicing rules are obeyed as normal
Note: If the Separate Invoices option is enabled in the client's Profile or Client Group, when selecting multiple items here with the same Next Due Date, separate invoices will still be generated.
Delete Selected Items
This button can be used to delete multiple items en-mass. Tick the checkboxes next to the services or quotes you wish to remove from GoBiller and click the Delete Selected Items button.
This will remove the record form GoBiller, but will not trigger any module commands (ie. a hosting account associated with a service will stay on the server).