 English


Contact List Segments
Segments are sets of contact list members who all fulfil certain criteria. For example, all
members of a contact list whose e‐mail addresses end in “.co.uk”.
You can use multiple criteria to define segments. For example, all members of a contact list
with two or more children and a household income of over $100,000.
The criteria that you can use to define segments depend on the built‐in and custom fields
you use for the contact list. This allows you to target the audience for each of your email
campaigns with great precision, as long as you collect the right information about your
contacts.
For instance, a record company promoter ensures that all the people who sign up for his
label’s email newsletter give their age and location. This means he can later target an email
campaign inviting recipients to a label party in a Manhattan nightclub to the right segment
of his contact list: those who are over 21 years old and live in New York.
Segments can belong to a single list, or span multiple lists
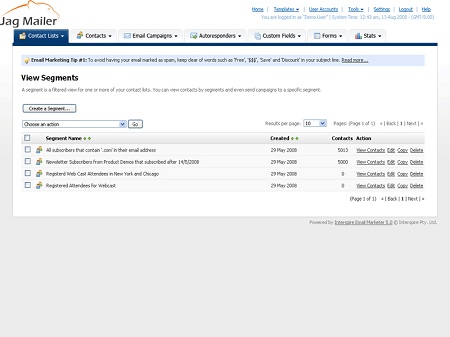
Creating, Editing and Viewing Segments
Click Contact lists in the navigation bar, then click View segments.
Create a segment
- Click this to define a new segment of one or more contact list contacts.
- Select a box belonging to a segment before choosing an option from the Choose an action list.
- Select the box at the top of the column to select all segments.
Choose an action
Use this to delete one or more segments. Select the segment (or
segments) you want to delete and select Delete the selected segment(s).
Segment Name
This displays the descriptive name of the segment.
Created
This displays the date on which the segment was defined.
Contacts
This displays the current number of contacts within the segment (those in
the relevant contact list or lists, whose information matches the
segment’s rules).
Action
- Click View contacts to see a list of all the contacts in a segment.
- Click Edit to modify a segment’s settings. The fields that display are the same as the Create a segment screen
- Click Copy to create a new copy of the segment. The new segment displays, with “Copy of” appended to the original name.
- Click Delete to remove the segment from Interspire Email Marketer.
Note: When you delete a segment, the contacts in the segment are not
deleted.
Creating a Segment
Take the following steps to create a segment:
- Click Contact lists in the navigation bar, then View Segments
- Click Create a Segment.
- Enter a descriptive Segment name.
- In the Segment contacts from list, select the contact lists you want to include in the segment. You can use the search box below the list to find contact lists.
- Choose a Match type. This controls how Interspire Email Marketer applies the rules you configure.
- Select Match all rules (AND condition) to find only contacts who match every rule you define.
- Select Match any rule (OR condition) to find contacts who match one or more of the rules you define.
- Define your Segment rules. These are the conditions a contact must match to be included in the segment
Do the following for each rule:
- The first drop‐down list contains the fields available for the contact list (or lists) you selected. Select the basic or custom field you want to base the rule on.
- In the second drop‐down list, select contains to search for contacts that match the
- information you add in the text field. Select does not contain to search for contacts that do not match the information you add in the text field.
- In the text field, enter the information you want to search for.
- When you have finished configuring your rules, click Save. The View segments screen displays, with the new segment in the list.
Alternatively click Cancel to return to the View segments screen without saving your
changes.
Viewing a Segment’s Contacts
To view a list of the contacts belonging to a segment, click Contact lists in the navigation
bar, select View segments, and then click the View contacts link next to a segment.
You can:
- Add a new contact: add a contact to Interspire Email Marketer.
- Delete selected contact(s): remove the selected contacts from Interspire Email Marketer.
- Update contacts to receive text campaigns: change the status of selected contacts, allowing them to receive emails in text format.
- Update contacts to receive HTML campaigns: change the status of selected contacts, allowing them to receive emails in HTML format.
- Update contacts status to confirmed: confirmed contacts are those who have replied to a confirmation request email. Use this to change the selected contact or contacts to confirmed status.
- Update contacts status to unconfirmed: unconfirmed contacts are those who have not yet replied to a confirmation request email. Use this to change the selected contact or contacts to unconfirmed status.
You can also view, edit and delete contacts.
Viewing Segment Contacts
View
This displays the segment name. Click the triangular icon to view Contact
lists or Segments.
Search
Use this to search for contacts in the segment by their email address.
Enter your search term in the text field and click the Search button.
Click Advanced search to go to the Contacts > Search contacts screen.
Add a contact to my list
Click this to add a new contact to Interspire Email Marketer. The screen
that displays is the same as the Contacts > Add a contact > Next screen.
Note: When you use this option, the contact is not necessarily added to
the segment. The contactis added to the segment only if itfulfils the
segment’s criteria.
Choose an action
- Select one or more contacts, select an option from the list and click Go to perform the selected action.
- Select a box belonging to a contact before choosing an option from the Choose an action list.
- Select the box at the top of the column to select all contacts.
Email address
This is the address to which emails for this contact are sent.
Date added
This is the date this contact was added to the contact list.
Email format
- This displays HTML if the contact is configured to receive HTML emails.
- This displays Text if the contact is configured to receive plain text emails.
Activity status
- This displays active if emails are sent to the contact.
- This displays unsubscribed if the contact was unsubscribed from the list.
- This displays bounced if emails to this contact have not been delivered, and emails are no longer sent to the contact.
Confirmed
- This displays Confirmed if the contact has replied to a confirmation request email.
- This displays Unconfirmed if the contact has not yet replied to a confirmation request email.
Contact list
This displays the name of the contact list to which this contact belongs
Action
- Click View to see information about the contact. The Contacts > View contact screen displays.
- Click Edit to modify the contact’s information. The Contacts > Edit contact screen displays.
- Click Delete to remove the contact from Interspire Email Marketer.


