 English


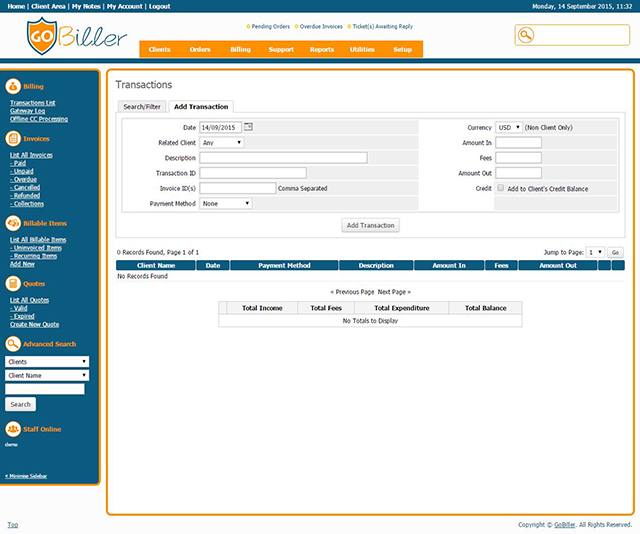
Transaction
You will need to enter transactions manually if you receive payment from a client by an offline means such as cheque or wire transfer. Or for example to enter external transactions into GoBiller such as expenditures you make to pay for your servers and/or other services. It is important you do this correctly to ensure the figures in your GoBiller system are correct so here's how you do it:
- Begin by going to Billing > Transactions List
- Select the Add Transaction tab at the top of the page
- Then you can choose the client it relates to (if any), date of the payment, gateway used, enter a description, transaction id (if applicable) and the amount
- If this is a payment that the client should be allowed to apply to invoices later (ie. a prefunding or payment on account) then you should tick the Add as Credit checkbox which will automatically create the appropriate credit entry for the user
- Once happy with the settings, click the Add Transaction button to complete the process
Note
It is necessary to either enter Invoice ID(s) or tick the Add as Credit checkbox. Failure to do either will result in the transaction not being applied against an invoice or credited to the client's account.
Account Prefunding/Add Funds
There are times when a client might want to deposit money with you in advance. For example if they are about to place a number of orders, or they are going on holiday. And GoBiller allows for this using the Account Prefunding/Credit feature.
For details, please see Add Funds
Managing Credit
You may want to add credit to a client if they overpay one month or if you have some downtime which you want to provide credit for. With GoBiller, you can give the client a credit balance and when their next invoice is generated, this credit will be automatically applied to it. If the credit is enough to cover the entire invoice, the invoice is automatically marked paid. Otherwise, the total amount due is just decreased by the required amount.
Issuing Credit to a Client
See Adding a Manual Transaction above for if you are adding a payment that doesn't relate to any specific invoice and want to add it to the users credit balance so it can be used to pay invoices.
Alternatively, to add a credit without any payment, you would follow the steps below:
- Begin by going to the Clients Summary page for the client you wish to add Credit to
- Next click the Manage Credits link to open the window
- In the popup window that is displayed, click the Add Credit button
- Enter a description for the credit for your records and the amount of credit to add and click Save Changes
- The credit will be added to the clients balance and credit entry shown on the credits list
Removing Credit from a Client
- Begin by going to the Clients Summary page for the client you wish to add Credit to
- On the Actions section, click the link "Manage Credits"
- In the popup window that is displayed, click the Remove Credit button
- Enter a reason for removing the credit for your records and the amount of credit to remove (a positive number) and click "Save Changes"
- The credit will be removed from the clients balance and entry shown on the credits list

If raising a new invoice or wanting to pay an existing one with credit from the users available balance, then this is how to do it:
- Begin by locating the invoice with a search or from the invoices list
- Once viewing the invoice, select the Credit tab
- In the Add Credit to Invoice section, enter the amount of credit you wish to transfer from the client's account credit balance to this invoice
- Click Go to complete the process
Clients also have this ability when viewing an invoice in the client area if they have a positive credit balance.
Removing Credit from an Invoice
If credit has been applied to an invoice but the client does not want to use their credit towards this particular invoice it can be removed.
- Begin by locating the invoice with a search or from the invoices list
- Once viewing the invoice, select the Credit tab
- In the Remove Credit from Invoice section, enter the amount of credit you wish to transfer from this invoice to the client's account credit balance.
- Click Go to complete the process
If the invoice has been fully paid by credit it is next necessary to change the status back to Unpaid via the Options tab and reverse any automation that may have been triggered (eg. moving the service's Next Due Date back one billing cycle).
Automatic Credit
A credit is added to the users account automatically when an invoice is overpaid. A common cause of this is when the client sets up more than 1 PayPal Subscription. This will appear in the log as "Credit for Overpayment of Invoice #xxxx"
Reviewing Credit Logs
If you want to see why a client has been given credit, you need to click the Manage Credit link on the Client Summary page. You will then see a list of credit log entries for the selected client. You have the option to delete entries if you wish and they will then be deducted from the credit balance.
Searching Transactions & Handling Reversals
So you've had a cheque bounce, or you've received a chargeback/dispute for a transaction you already applied? Chances are the actions that payment should trigger, such as renewal of a product, domain registration or renewal, have already happened and can't be reversed. So what you need to do is deduct the amount from your income and issue the client a new invoice to re-pay. So let's take an example of a transaction paid by 2CheckOut with the transaction ID "6A5245278HM" and see how we would handle that.
- Begin by going to Billing > Transactions List
- This will show you a list of all the transactions recorded in your GoBiller system
- Next, click the Search/Filter tab at the top - the various filtering options available will appear
- We know this transaction was made using 2CheckOut so we select 2CheckOut in the Gateway Dropdown List
- We also know the transaction ID so we enter this in the Transaction ID field as shown below
- Once you have completed selecting filter options, click submit
- Any matching transactions will be displayed.
- From here we can see the transaction date, client who made it and the invoice they were paying
- Now you can click into the invoice that transaction was applied to, and use the Refund tab to apply a "Record Only" refund to deduct the amount paid from your income and show that invoice as no longer paid
- Following that, you need to decide what to do with the items on the invoice. For example if it's a product, you might want to go and suspend that product from the clients profile to prevent any further use. And if it's a domain you might want to contact the registrar and see if a cancellation is a possibility.
- After taking care of the products, you may then want to create a new manual invoice for repayment - for example if the dispute is a mistake or the client has contacted you - so you can do that simply by raising a custom invoice, and with that you can also apply any fees or surcharges you may have incurred for the disputed payment. You should not attempt to re-invoice the original items for repayment as that could lead to double incrementing of due dates, and double renewal actions on products & services.


